Tuesday, February 16, 2021

Apple IPad2 10w USB Charger repair log.


    My original Apple IPad2 10w charger was failed to power on after a long period of unused. Since a USB charger is used in almost every single device these days. It would be good if I can repair this 10w charger and at least repurposing it for charging a small device. Even though it probably not a good idea to use these abused repaired chargers for a brand new IPad anyway.


Warning: This repair is considered experimental and probably potentially unsafe. These charger circuits are main voltage-operated and capacitors may retain charge for some period of time. Don't attempt these repairs unless you know how to work with a high voltage circuit safely.


    The hardest part of this repair was to taking this charger apart. Since this charger case is weld together very strong. My initial go-to idea of splitting these cases with a flat head screwdriver was seemed to be impractical. So I have to cut through the seam first with a small Dremel cutting tool. But extreme care has to be taken since these circuit components are very close to the case. The cutting edge was so roughly cut and spaced apart that at first, it seems to be impossible to assembly it back.


    This is a Dremel cutting blade I used. Noted that this blade was already bent before.


    The top side of the PCB. The component was fitted tightly that there was almost no space left.


    The bottom side of the PCB. Noted these cut-out sections of the PCB where a part of the case plastic would go through and provide additional electrical isolation distance.


    On this side, there is a low voltage filter capacitor. One of the key failure point in SMPS circuit, But this one use solid capacitor which ESR test was passed.


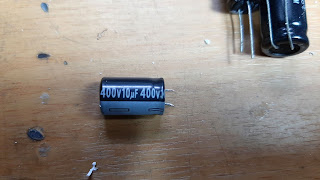
    This is a high voltage filter capacitor which is a culprit in this case. The capacitor failed an ESR meter test.


    The original capacitor is a 10uF 400v AiSHi 105°C electrolytic capacitor.


    But none of my 10uF 400v capacitors would fit in, So I decided to use a 4.7uF capacitor instead which fit perfectly.


    Replacing a 10uF with 4.7uF is normally a no-no from a power ripple standpoint. But since I won't be using this adapter for phone/tablet charging. At least these should work.


    Placing the PCB back inside the case. Don't forget to put back these insulation tapes.


    Since the case was made of polycarbonate and the gap is so wide that glue won't be filling it, So I try a 3D Pen plastic welding technique using an ABS filament, and surprisingly PC plastic is bond together with ABS filament very well.


    Generic ABS filament I used to weld these cases.


    Finished, Initial testing shows that this 10w charger can power a 4 bank 18650 charger well and also able to power a small LED ring light in my studio without noticeable flicker.


Tuesday, July 2, 2019

DIY USB KVM selector using audio selector. (1 keyboard -> 2 computer)


    The simplest hardware solution to control 2 computers with 1 set of mouse and a keyboard.
For this project, you would need.
  • 4 pole 3-way rotary selector.
  • 2x USB Cable (Printer cable)
  • Female USB connector. (from old USB Hub)
  • Small plastic box (I use dental floss box).
  • A working USB Hub for connecting Mouse and Keyboard.


     The reason you will need a 3-way selector while only use 2 of them is that this kind of selector will momentary short between adjacent position while turning so you should use a 3-way selector while leaving the center position unconnected.
    I use twist-pair cat5 wire for connection.

Wiring diagram


    USB female connector can be harvested from a dollar store USB Hub.


Finished product.
Two USB cables (white) are connected to both computers, PC or Mac.
Connect a USB hub to the female USB connector.
Connect mouse & keyboard to the USB Hub.


    If you are using a USB 2.0 hub you can also plug a USB Flash drive to share between computers as well, Just remember to eject the flash drive before switching.


Floppy drive themed CF Card reader for Retro Gaming PC


    Recently, a retro computer gaming pc is making a come-back, many of us are digging a two-decade-old PC out of a junk pile to make a DOS gaming PC only to found out that while most of the electronic are mostly usable, an old hard drive usually didn't last through these decades.

    Sourcing old IDE hard drive also possible but another more convenient is to use Compact Flash to IDE adaptor which not only serves as an HDD replacement but also make copying file from a modern system much easier by plugging it in a card reader.

    Many of the cheap converters come for internal install without any front-panel mounting which inconvenient for card swapping, Those with front panel mount were more expensive and their design doesn't match the old computer case, So why not making one from a broken floppy drive bezel.


Left: CF to IDE adaptor.
Right: Old 3.5 floppy drive (Mitsumi) with a mechanical part removed.


CF to IDE Adaptor was mounted with two M3 screws.
Optional: Solder a LED bulb in parallel with an onboard led for an indicator.


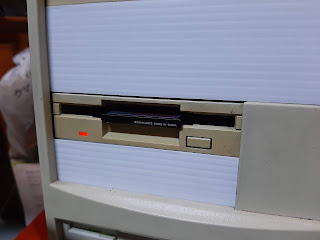
A finished device installed on an old computer. Can you tell which one is a real Floppy drive?


Inserting a CF card.

Monday, November 9, 2015

DIY Animation Light box from old LCD screen.


    Animation Lightbox can be somewhat expensive and old LCD screens with the broken screen are somewhat useless, Basically, an LCD screen is essentially a lightbox with an LCD panel attached to it. So we are converting it to an animation lightbox.

WARNING: LCD screen especially the one with CCFL backlight contain a HIGH VOLTAGE inverter and capacitor in switching power supply circuit may have some residue charge even after unplugging, CCFL tube may also contain some mercury.


    For this project, you need an LCD screen with a functional CCFL or LED backlight, Some LCD screen will automatically turn off if no signal was connected and will not work unless the circuit was modified. this unit just showing NO SIGNAL text on the screen for a long time so no modification to the circuit is needed, My screen is 15 inches Philips 150B3.


    Disassembly the LCD monitor and remove the LCD Panel (The front glass with ribbon cable)  Carefully not to damage the backlight or the circuit board and assembly it back.


    Before put on the front bezel, Apply the electrical tape on any exposed metal frame


 Finished.


 Powered On.


Electricity consumption test.


With clear acrylic sheet and homemade peg bar taped on.

Sunday, September 20, 2015

Wacom intuos pen grip

    Has used a Wacom tablet and it's working great, But personally, I have a feeling that the grip was a little bit too slippery and thin for my likeliness.
    Tried search for many mods but couldn't find one that fit on Wacom's pen while still allowed the side rocker switch to be usable.


    I found this foam pencil grip at my local stationery shop, they are very cheap and sold in a pack of many colors, but unfortunately, it was too thin for my Wacom Intuos pen, so I try to cut it open and with a little dab of blu-tack to hold it in place, was working perfectly.


    This doesn't require any modification on the pen and the side rocker switch still working properly.
    After using this for a while I feel that the pen required less gripping force and was reduced my hand strain by some degree. Through this more of individual preference. 

Tuesday, December 23, 2014

Installing LED Projector (Celling Mount)


    วันนี้เราจะมาติดตั้ง Projector กันครับ โดย Projector ที่ใช้คือ Vivitek QUMI Q2 เป็น Projector พกพาระบบ LED เนื่องจากมีอายุหลอดที่นานถึง 30,000 ชั่วโมง และการใช้งานสามารถ เปิด-ปิด เครื่องได้ทันทีไม่ต้องรอ Cool-down แต่ข้อเสียของ Projector ระบบนี้ก็คือส่วนใหญ่จะมีความสว่างที่น้อยกว่าเครื่องทั่วไป สำหรับเครื่องนี้อยู่ที่ 300 lumen เท่านั้น ทำให้ต้องการห้องที่สามารถควบคุมแสงได้ดี (มืด) ที่จริงรุ่นใหม่ที่สว่างกว่านี้ก็มี แต่ที่เลือกรุ่นนี้เพราะลดราคา(ตกรุ่น) นั้นเอง แต่ก็ไม่ใช้ปัญหาเพราะห้องที่ติดตั้งมีม่าน UV อยู่แล้ว และความละเอียดระดับ 720p (1280 x 800) ซึ่งเป็นระดับที่สามารถใช้ดูหนังได้ดีพอสมควร (ถ้าความละเอียดต่ำกว่านี้จะไว้ Present งานมากกว่า)

    ส่วนจอรับภาพที่ใช้เป็นของ Acer แบบมือดึงธรรมดา Gain 1.0 ขนาด 70 x 70 นิ้ว (เวลาฉาย 16:9 จะเท่ากับโทรทัศน์ประมาณ 80 นิ้ว)

    ก่อนที่จะติดตั้ง Projector เราควรจะมีการคำนวณระยะและทดลองฉายดูก่อน  เนื่องจาก Projector แต่ละตัวมีระยะฉายที่แตกต่างกัน โดยจะบอกเป็น Throw ratio เป็นอัตราส่วนของ ระยะที่ฉาย / ความกว้างของภาพที่ฉาย เช่นเครื่องนี้ Throw ratio 1.55 ก็จะได้ภาพกว้าง 67 นิ้ว ที่ระยะ 67 x 1.55 = 103.85 นิ้ว เป็นต้น หรือง่ายกว่าก็ใช้ http://www.projectorcentral.com/Vivitek-Qumi_Q2-projection-calculator-pro.htm

คำนวนเอาก็ได้ครับ


    LED Projector has the advantage of 30,000 hours of lamp life so I won’t have to count for a replacement bulb. Also by using LED Lamp mean it can be turn on-off instantly. The only limitation was its brightness was only 300 lumen which means to make a good projection your room has to be almost completely dark. (My room already had a UV curtain, so not a problem.) The projector is Vivitek’s QUMI Q2 LED Projector (A little-bit outdated but found on-sale). It’s 720p which is entry-level multimedia projector.

    The screen is an Acer standard manual pull-down 70 x 70-inch screen (Gain 1.0). Projection in 16:9 mode equivalents to about 80” TVs screen.

  Before installing a projector you should calculate a projecting distance and test fire before real installation because the throw ratio of each projector model is different, in this case, the throw ratio is 1.55 which mean we will get a 67” width picture with a projector 67 x 1.55 = 103.85” from screen. Or use the calculator at


นี้คือเครื่องที่จะติดตั้งครับ

Projector to be install.


ทดสอบระยะฉาย

Test Range


Projector นี้ใช้ตัวยึดแบบขาตั้งกล้องครับ

Projector has mounting point for the camera tripod.


ชุดอุปกรณ์ติดเพดาน และสาย HDMI ยาว 15 เมตร

Celling mount kit and 15 meter HDMI cable.


ชุดติดตั้งไม่ได้ออกแบบมาสำหรับ Projector ขนาดเล็ก จึงต้องมีการดัดแปลงตัวยึดกันนิดหน่อย โดยน็อตที่ใช้ยึดเป็นน็อตยึดเหล็กฉากที่หาได้ตามร้านก่อสร้างทั่วไปครับ


This ceiling mount kit doesn’t have a mounting hole and screw for this small projector so a little mod is needed. The screw used to mount a projector can be found in the local hardware shop.


ติดตั้งกับเพดานโดยใช้พุกเหล็ก

Projector mounted to the ceiling using a steel anchor.


สำหรับ Screen เนื่องจากกำแพงเดิมมีโคมไฟและโทรทัศน์ติดอยู่ จึงต้องติดตั้งให้ห่างออกมาจากกำแพง 25 เซนติเมตร โดยใช้ขาแขวนหิ้งและตะขอรูปตัว S ครับ


For screen installation, we use a pair of wall shelf bracket and a pair of S-hook, hanging distance is 25 centimeter from the wall (away from wall lamp and TV).


ขาแขวนหิ้งจะมีพุกพลาสติกมาให้ในชุด แต่เพื่อความแข็งแรง เราจะใช้พุกเหล็กแทน (กลัวหล่น)

The bracket came with a plastic fixer, but a safety reasons, I use a steel anchor instead.


ตำแหน่งที่แขวนอยู่หน้า TV 32 นิ้ว (ไว้ใช้สำหรับดูตอนเปิดไฟ)

The screen is hanging in front of the TV (32” LCD for daytime TV watching.)


เนื่องจากเป็น Projector ระบบ LED และไม่มีปุ่มปิดเปิดบน Remote จึงใช้วิธีต่อผ่านสวิตซ์ไฟ เพื่อความสะดวก


Since this projector is LED type and its remote doesn’t even have a power button, A wall switch was repurposed for controlling a projector.


อุปกรณ์ที่ใช้เล่นหนัง HD เป็น Raspberry Pi ที่ติดตั้งโปรแกรม OpenElec (XBMC). ส่วนระบบเสียง 5.1 ใช้ HDMI ผ่าน AVR เอาครับ


The movie is played from Raspberry Pi running an OpenElec (XBMC) software. Audio system 5.1 is via HDMI through AVR.


ทดสอบ
Test Run


ปิดไฟ
Light off.


Camera Canon EOS400D @ ISO1600 1/25 sec f/4.5


ทดสอบกับ XBOX360
Gaming test (XBOX360)


Openelec.


สรุปผล
    ภาพที่ได้ค่อนข้างน่าพอใจ ให้ภาพได้สว่าง คมชัด สีสดใส (ในห้องมืดสนิด). มีปัญหาในการใช้งานเล็กน้อยคือ Focus ของเครื่องจะเปลี่ยนไปเล็กน้อยเมื่อเครื่องร้อนขึ้น  ซึ่งแก้ได้ด้วยการเปิดเครื่องทิ้งไว้ประมาณ 10 นาที ก่อนใช้งาน เพื่อให้อุณหภูมิเลนส์นิ่งก่อน

Conclusion:
    Resulting image is pretty good, clear, and bright (in an almost completely dark room). The only glitch was minor focus shift problem (need to wait around 10 minutes after turn-on for projector lens to warm-up before the image return to the focus.)