เครื่องวัด ESR Meter นี้เป็นเครื่องมือที่ใช้ในการทดสอบ ตัวเก็บประจุ (Capacitor) ว่าเสียหรือไม่ โดยการวัดค่าความต้านทานภายในของ C นั้นๆ มีหน่วยเป็น Ohm ซึ่งจะแตกต่างกับ Ohm Meter ปกติที่จะวัดความต้านทานด้วยไฟกระแสตรง (DC) แต่เครื่องนี้จะวัดความต้านทานโดยใช้ไฟกระแสสลับ (AC) ความถี่ประมาณ 50 KHz ที่มีแรงดันต่ำ ทำให้สามารถใช้ตรวจสอบ C บนอุปกรณ์เช่น Main board และ Power Supply ได้โดยไม่ต้องถอด C ออกมาทดสอบ
C ปกติจะอ่านค่า ESR ได้ต่ำมาก (ใกล้เคียง 0) โดยการเทียบค่าความต้านทานที่อ่านได้กับค่าในตาราง ถ้าค่าที่อ่านได้สูงกว่าก็แสดงว่า C ตัวนั้นเสียนั้นเองครับ
ESR Meter is an essential tool for testing a Capacitor in the circuit when debugging a circuit with a large number of capacitors like a Computer Mainboard, Power Supply, and more.
ESR Meter measures a series impedance of a capacitor reading in Ohm similar to an Ohm meter. But an Ohm meter is measuring a resistance in DC which is unsuitable for capacitor measurement. An ESR Meter is using a low-voltage ~ 50 kHz AC for measurement.
The normal Capacitor ESR reading is near the shorted circuit. By comparing a measured value with the value on a table we can identify a failed capacitor easily.
Update(16/02/2021): Added PCB and DesignSpark PCB downloads.
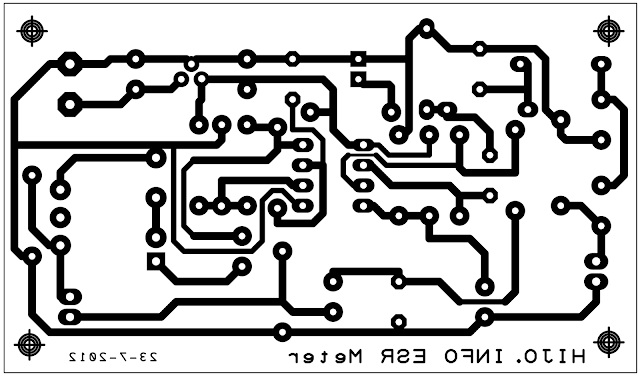
Download PCB and DesignSpark PCB CAD files
Note: In this PCB the IC 78L05 needs to be install flipped like the photo below.
Circuit Diagram of ESR Meter (Modified version of this circuit)
วงจรในขั้นทดลอง
The testing circuit on the Breadboard.
รูปคลื่นที่ใช้ในการวัดค่า ESR
The waveform of ESR Measuring signal.
Download PCB and DesignSpark PCB CAD files
ลายวงจรนี้มีข้อผิดอยู่นิดนึงคือ IC 78L05 ต้องใส่กลับด้าน ตามรูปด้านล่างนะครับ
Homemade PCB using a Toner Transfer Technique.
This PCB has some library flaw that the IC 78L05 needs to be install flipped like the photo below.
สำหรับหม้อแปลงที่ใช้นั้นเป็นหม้อแปลงจาก Power Supply เก่าครับ
The transformer used in this circuit came from an old ATX computer power supply.
Test the meter by connecting the test lead together and adjusting the Zero Adjust Knob till the meter reading full scale (100 uA) and test measuring a resistor of various value and note the uA reading in a table for scale plotting.
Remove the Amp Meter scale and scan as a pattern for drawing a new ESR Meter scale by using the plotted data. If a high resolution is required then use an Interpolation. In this prototype, I use MS Excel Interpolation.
Table of ESR Value for a normal capacitor.
หน้าตาของเครื่องต้นแบบที่เสร็จสมบูรณ์
Finished prototype ESR Meter.
อ้างอิง
Reference
http://www.ludens.cl/Electron/esr/esr.html


